Why get good at bodyweight training before going hard with weights?
1. Establishing Fundamental Movement Patterns:
- Developing Proper Form: Bodyweight exercises like push-ups, squats, and planks teach you the fundamental movement patterns that are essential for safe and effective weightlifting. These exercises help you learn how to engage the right muscles, maintain a neutral spine, and move with proper alignment. Without mastering these basics, you are more likely to develop bad habits and improper form when lifting weights, increasing the risk of injury.
- Muscle Memory: Practicing bodyweight exercises helps build muscle memory for proper form, which carries over to weight training. For instance, learning to keep the back straight during bodyweight squats lays the groundwork for proper form when progressing to barbell squats.
2. Building Joint and Tendon Strength Safely:
- Conditioning Connective Tissue: Bodyweight exercises place less stress on the joints compared to heavy weights, making them ideal for gradually conditioning your tendons and ligaments. This gradual strengthening is crucial for preparing your body to handle the increased loads of weight training safely, reducing the risk of joint injuries.
- Injury Prevention: Starting with bodyweight training helps ensure that your joints and tendons are strong enough to support heavier weights. It’s a safer way to build up the joint stability and tendon strength needed to handle the stress of lifting weights without getting injured.
3. Enhancing Core Stability and Overall Balance:
- Core Engagement: Bodyweight exercises inherently engage the core, which is essential for stability. A strong core supports the spine and helps maintain proper posture, crucial for performing weightlifting exercises safely. If you jump straight into weight training without a solid core foundation, you risk improper form, which can lead to back injuries and other issues.
- Balance and Coordination: Unilateral bodyweight exercises (e.g., single-leg squats, one-arm push-ups) enhance balance and coordination by forcing each side of the body to stabilize independently. This builds a balanced foundation that helps prevent the development of muscular imbalances, which can compromise lifting technique and increase injury risk.
4. Developing Functional Strength:
- Translatable Strength: Bodyweight exercises develop functional strength that mimics real-world movements. This means you are not just getting stronger, but you are also becoming more capable in everyday activities and athletic movements. This functional strength serves as a foundation for the more specific, targeted strength developed through weight training.
- Natural Progression: Bodyweight training allows for natural progression in strength and complexity. You can start with easier variations and gradually move to more challenging ones (e.g., progressing from knee push-ups to standard push-ups, then to one-arm push-ups). This controlled progression reduces the risk of overloading your muscles too quickly, which can happen if you start with weights that are too heavy.
5. Improving Flexibility and Range of Motion:
- Mobility: Bodyweight exercises require and promote a full range of motion. This improves flexibility, which is crucial for performing weightlifting exercises correctly. Poor flexibility can lead to compromised form, such as partial squats or limited shoulder mobility, which reduces the effectiveness of exercises and increases injury risk.
- Foundation for Advanced Movements: Having a good range of motion prepares your muscles and joints for advanced weightlifting techniques that require more flexibility, such as deep squats or overhead lifts. Without this foundation, you may struggle with proper form when lifting heavier weights.
6. Developing Proprioception and Mind-Muscle Connection:
- Body Awareness: Bodyweight training enhances proprioception, or the body’s awareness of its position in space. This is crucial for maintaining proper form under the stress of weight training. Knowing how your body moves and feels during bodyweight exercises helps you better understand how to position your body correctly when lifting weights.
- Mind-Muscle Connection: Learning to focus on specific muscle engagement during bodyweight exercises helps develop the mind-muscle connection. This connection is vital for targeted muscle development in weight training, ensuring that the intended muscles are doing the work, which maximizes strength gains and muscle growth.
Conclusion:
By getting good at bodyweight training first, you create a solid foundation of movement quality, joint integrity, balance, core strength, and flexibility. This foundation not only minimizes the risk of injury when you begin weight training but also maximizes the effectiveness of your weight training efforts. Skipping this step can lead to improper form, muscle imbalances, joint issues, and slower strength gains, ultimately making your fitness journey less efficient and more prone to setbacks. Establishing this foundation is a smart, strategic approach to building long-term strength and fitness.
Structured Push-Up Program for Bench Press Strength
Editors note: Remember Press ups will ultimately build your endurance and conditioning along with hypertrophy. Those things can support maximum strength training but are not quite the same thing. However read the addendum at the end 😉
Training Frequency:
- Weekly Routine: Perform this program 3-4 times per week. Each session will include variations of push-ups, dips, pull-ups, and occlusion training. Rest at least one day between sessions to allow for recovery.
Phase 1: Base Building (4-6 Weeks)
Objective: Build foundational strength, endurance, and stability while beginning occlusion training.
- Standard Push-Ups: 3-4 sets of 15-20 reps. Focus on form, engaging the chest, triceps, and shoulders. Rest 60-90 seconds between sets.
- Incline Push-Ups: 3 sets of 15-20 reps. Use a bench or step to place hands higher than feet. Rest 60 seconds between sets.
- Ring Push-Ups: 3 sets of 8-12 reps. Introduce ring push-ups to engage stabilizers. Rest 90 seconds between sets.
- Dips: 3 sets of 8-10 reps. Use parallel bars or rings. Focus on controlled movement to protect shoulders. Rest 90 seconds between sets.
- Pull-Ups: 3 sets of 6-8 reps. Perform overhand grip pull-ups, focusing on full range of motion. Rest 90 seconds between sets.
- Occlusion Training: Apply occlusion straps during the last 1-2 sets of each exercise (push-ups, dips, pull-ups). Use light to moderate pressure. Perform 12-15 reps per set when using occlusion.
Phase 2: Progressive Overload (6-8 Weeks)
Objective: Introduce added resistance to increase strength and muscle mass.
- Weighted Push-Ups: 3-4 sets of 8-12 reps. Use a weight vest or backpack. Increase weight as you progress. Rest 90-120 seconds between sets.
- Decline Push-Ups: 3 sets of 10-12 reps. Elevate feet on a bench to shift focus to the upper chest. Rest 90 seconds between sets.
- Resistance Band Push-Ups: 3 sets of 10-15 reps. Use a resistance band around your back. Rest 90 seconds between sets.
- Ring Dips: 3 sets of 8-10 reps. Adding rings adds instability, challenging stabilizers. Use a weight belt if bodyweight becomes too easy. Rest 90-120 seconds between sets.
- Pull-Ups: 3 sets of 8-10 reps. Use different grips (overhand, underhand, neutral) for variety. Consider adding weight once bodyweight is manageable. Rest 90 seconds between sets.
- Occlusion Training: Continue using occlusion straps for the last 1-2 sets of each exercise. Adjust pressure for comfort and safety, focusing on the increased pump and muscle fatigue. Perform 10-12 reps per occlusion set.
Phase 3: Plyometric and Power Development (4-6 Weeks)
Objective: Develop explosive power and enhance fast-twitch muscle fiber activation.
- Plyometric Push-Ups: 2-3 sets of 5-8 reps. Push explosively off the ground, maximizing airtime. Rest 90-120 seconds between sets.
- Clap Push-Ups: 2-3 sets of 5-8 reps. Add a clap mid-air to ensure maximum explosiveness. Rest 90-120 seconds between sets.
- Speed Push-Ups: 3-4 sets of as many reps as possible in 10-15 seconds. Focus on speed and explosiveness. Rest 90 seconds between sets.
- Ring Muscle-Ups (Optional, Advanced): 2-3 sets of 3-5 reps. Combines pulling and pushing movements for a full upper body challenge. Rest 120 seconds between sets.
- Dips: 3 sets of 6-8 reps. Continue with standard or weighted dips. Rest 90-120 seconds between sets.
- Pull-Ups: 3 sets of 6-8 reps. Include explosive pull-ups or weighted variations. Rest 90 seconds between sets.
- Occlusion Training: Use occlusion straps during speed push-ups, dips, and pull-ups for the last 1-2 sets. Perform 8-10 reps per occlusion set, ensuring proper safety and monitoring.
Phase 4: Occlusion Training and Strength Integration (4-6 Weeks)
Objective: Maximize hypertrophy, transition gains into bench press strength, and continue occlusion training.
- BFR Push-Ups (Rings or Standard): 3-4 sets of 10-12 reps. Apply occlusion straps to enhance muscle activation and metabolic stress. Rest 90 seconds between sets.
- BFR Dips and Pull-Ups: 3 sets of 8-10 reps. Continue using occlusion straps to increase muscle activation. Rest 90-120 seconds between sets.
- Weighted Push-Ups or Decline Push-Ups: 3 sets of 8-12 reps, using heavier weights than earlier phases. Rest 90 seconds between sets.
- Bench Press Integration: 3-4 sets of 5-8 reps, starting with manageable weight and progressing. Focus on re-acclimating to the bench press movement. Rest 120 seconds between sets.
- Ring Muscle-Ups (Optional): 2-3 sets of 3-5 reps, focusing on strength and coordination. Rest 120 seconds between sets.
Measuring Progress and Adjustments
- Regular Testing: Test your bench press max every 4-6 weeks to track progress. Use these benchmarks to adjust intensity and volume.
- Flexibility and Mobility: Include dynamic warm-ups before training and static stretching post-workout. Focus on the shoulders, chest, and thoracic spine.
- Nutrition and Recovery: Prioritize a diet rich in protein for muscle repair and growth. Consider using creatine and other performance-enhancing supplements. Aim for 7-9 hours of sleep each night and stay hydrated.
Realistic Expectations
This program should help increase your bench press strength by up to 100 pounds by focusing on muscle memory, hypertrophy, power development, and stability. The timeline for achieving these gains could range from 6 months to a year, depending on your response to training and recovery.
Conclusion
This integrated program combines push-ups, ring training, dips, pull-ups, and occlusion to create a comprehensive strength and hypertrophy regimen. It’s designed to leverage your background as a former advanced lifter, utilizing progressive overload, instability, and occlusion training to maximize strength gains. By maintaining consistency and allowing for adequate recovery, this program will help you rebuild and exceed your previous bench press capabilities.
Addendum: Strength Correlation Between Push-Ups and Bench Press
Push-ups and bench press share a strong correlation, as both exercises engage the chest, triceps, and shoulders. Standard push-ups lift about 64% of body weight, while high-velocity push-ups with elevated legs can lift 70-75%. When performing one-arm push-ups, the effective load increases significantly, often lifting 75-80% or more of body weight with one arm.
This demonstrates elite strength levels, comparable to a 100kg athlete lifting approximately 160 kg (352 lbs) in a bench press, highlighting the effectiveness of advanced push-up variations for building upper body strength.
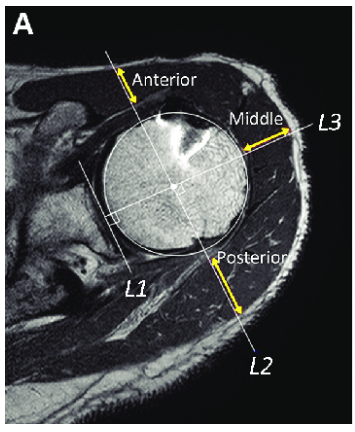
Understanding Deltoid Muscle Anatomy: Avoiding Common Misconceptions
The deltoid muscle, comprising the anterior, lateral, and posterior heads, is one of the most crucial muscles for achieving a well-rounded and balanced shoulder appearance. However, there’s a common misconception that needs to be clarified: when you view the shoulder from the side, much of the visible muscle mass is mistakenly attributed solely to the lateral (side) deltoid head. In reality, a significant portion of that mass includes contributions from the anterior and posterior deltoid heads.
Section 1: Anatomy of the Deltoid Muscle
The deltoid muscle is a triangular-shaped muscle that covers the shoulder joint, allowing for a wide range of movements. It is divided into three heads:
- Anterior (Front) Deltoid: This head originates from the clavicle and is primarily responsible for shoulder flexion, internal rotation, and horizontal adduction. It is heavily involved in pressing movements, such as the bench press and overhead press.
- Lateral (Side) Deltoid: The lateral deltoid originates from the acromion and is the main muscle responsible for shoulder abduction, which is the movement of lifting the arm away from the body. It’s typically targeted with exercises like lateral raises.
- Posterior (Rear) Deltoid: This head originates from the spine of the scapula and is responsible for shoulder extension, external rotation, and horizontal abduction. Exercises like reverse flyes and face pulls target the posterior deltoid.
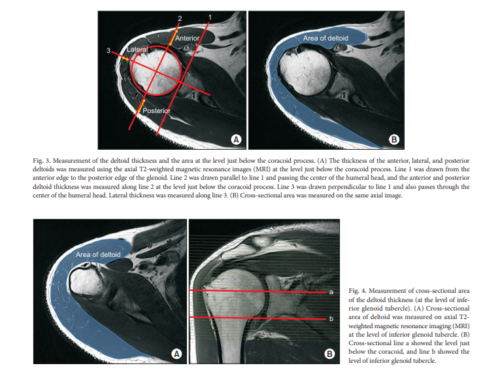
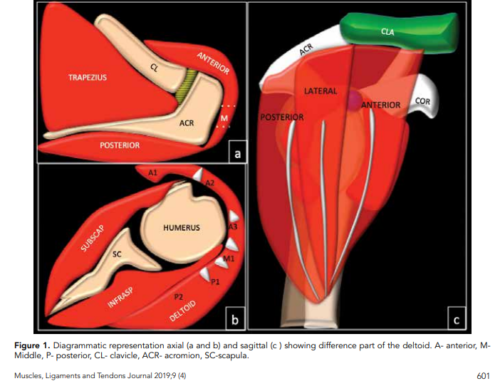
Section 2: The Side View Misconception
When viewed from the side, the shoulder’s rounded appearance is not due to the lateral deltoid alone. In fact, a substantial portion of what you see is the anterior and posterior deltoid heads wrapping around the shoulder joint. This anatomical overlap means that people often overestimate the mass of the lateral deltoid when, in reality, much of the visible muscle mass from this angle belongs to the front and rear deltoids.
This misconception can lead to an unbalanced training approach, where individuals may overemphasize lateral raises in an attempt to increase shoulder width, while neglecting other critical exercises that target the anterior and posterior deltoid heads.
Section 3: Exercises to Maximize Deltoid Growth
To achieve well-developed, balanced shoulders, it’s essential to target all three heads of the deltoid muscle with a comprehensive training approach. Here’s how to do it:
- Anterior Deltoid:
- Overhead Press: A compound exercise that targets the anterior deltoid along with the triceps and upper chest. Using a barbell or dumbbells, perform this exercise with controlled motion to maximize anterior deltoid activation.
- Front Raises: Use dumbbells or a barbell to lift the weight straight in front of you, focusing on the contraction of the anterior deltoid.
- Lateral Deltoid:
- Lateral Raises: This exercise isolates the lateral deltoid, helping to create shoulder width. To ensure maximum activation, avoid swinging the weights and keep the movement slow and controlled.
- Upright Rows: This movement targets the lateral deltoids and trapezius muscles. Use a wider grip to focus more on the lateral deltoid.
- Posterior Deltoid:
- Reverse Flyes: This exercise is crucial for developing the posterior deltoid. It can be performed with dumbbells, cables, or a machine.
- Face Pulls: Use a rope attachment on a cable machine to perform face pulls. This exercise not only targets the posterior deltoid but also improves shoulder stability and posture.
Section 4: Putting It All Together
To maximize deltoid growth while taking into account the relative size of each head, it’s essential to structure your workout with the correct volume distribution:
- Posterior Deltoid (Rear Deltoid):
- Exercise Volume: Because the posterior deltoid comprises about half of the total deltoid mass, it should receive approximately 50% of your deltoid training volume.
- Recommended Exercises:
- Reverse Flyes: 5 sets of 12-15 reps. This isolates the posterior deltoid and helps build rear shoulder mass.
- Face Pulls: 5 sets of 12-15 reps. This exercise not only targets the posterior deltoid but also improves shoulder stability and posture.
- Bent-Over Rows (with a focus on rear delts): 4 sets of 10-12 reps. Ensure that you keep your elbows high to target the posterior deltoid effectively.
- Anterior Deltoid (Front Deltoid):
- Exercise Volume: Given that the anterior deltoid is larger than the lateral deltoid, it should receive more attention, though less than the posterior deltoid.
- Recommended Exercises:
- Overhead Press: 4 sets of 8-10 reps. This compound movement is essential for developing the anterior deltoid, along with the triceps and upper chest.
- Front Raises: 4 sets of 10-12 reps. This exercise isolates the anterior deltoid, helping to build the front of the shoulder.
- Arnold Press: 3 sets of 8-10 reps. This variation of the overhead press gives extra attention to the anterior deltoid.
- Lateral Deltoid (Side Deltoid):
- Exercise Volume: As the smallest of the three heads, the lateral deltoid requires less volume but still plays a crucial role in shoulder width and aesthetics.
- Recommended Exercises:
- Lateral Raises: 4 sets of 12-15 reps. This exercise isolates the lateral deltoid and helps create shoulder width. Focus on controlled movement to maximize muscle engagement.
- Upright Rows: 3 sets of 10-12 reps. With a wider grip, this exercise targets the lateral deltoid effectively while also engaging the traps.
Balanced Deltoid Workout Example
- Reverse Flyes: 5 sets of 12-15 reps
- Face Pulls: 5 sets of 12-15 reps
- Overhead Press: 4 sets of 8-10 reps
- Front Raises: 4 sets of 10-12 reps
- Lateral Raises: 4 sets of 12-15 reps
- Arnold Press: 3 sets of 8-10 reps
- Upright Rows: 3 sets of 10-12 reps
This structure ensures that the posterior deltoid receives the most attention, followed by the anterior deltoid, with the lateral deltoid also being effectively trained to ensure well-rounded shoulder development. Adjusting volume based on the relative mass of each deltoid head will help prevent imbalances and contribute to a more aesthetically pleasing and functionally strong shoulder.
Conclusion
Understanding the anatomy of the deltoid muscle and recognizing the common misconception about the side deltoid’s mass is crucial for developing balanced shoulders. By targeting all three deltoid heads with a well-rounded training program, you can achieve the full, rounded shoulder appearance that is often desired. Avoid overemphasizing one head at the expense of others, and ensure that your training program allows for equal development across the entire deltoid muscle.
Balanced shoulder development not only improves aesthetics but also contributes to shoulder health and overall upper body strength. Remember, the deltoids are a complex muscle group, and effective training requires a comprehensive approach.
The Synergistic Benefits of Combining EMS, BFRT, and Isometric Exercises
Combining Electrical Muscle Stimulation (EMS), Blood Flow Restriction Training (BFRT), and isometric exercises can create a potent and efficient workout regimen that maximizes muscle activation, hypertrophy, strength, and neuromuscular adaptation. Each of these training modalities has unique benefits, and when integrated, they can enhance your fitness results significantly. Here’s an in-depth look at how these methods work together and the benefits you can expect.
Understanding the Techniques
Electrical Muscle Stimulation (EMS): EMS involves using electrical impulses to cause muscle contractions. This technique bypasses the central nervous system, directly stimulating the muscles. EMS can activate a high percentage of muscle fibers, including those not typically engaged during voluntary contractions, making it effective for strength training, endurance, and recovery (Wired Fit) (BarBend).
Blood Flow Restriction Training (BFRT): BFRT uses cuffs to partially restrict blood flow to the limbs during exercise. This creates a hypoxic environment, leading to increased metabolic stress and muscle fiber recruitment. BFRT is particularly effective for muscle hypertrophy and strength gains, even with low-intensity exercises (BioMed Central).
Isometric Exercises: Isometric exercises involve holding a muscle contraction without changing the muscle length. These exercises are excellent for improving muscular endurance, stability, and strength. Common isometric exercises include planks, wall sits, and static lunges (Fitness Fahrenheit) (Health & Fitness Blog – NASM).
Benefits of Combining EMS, BFRT, and Isometrics
- Enhanced Muscle Activation:
- EMS can stimulate high-threshold motor units and muscle fibers that are often underutilized during regular training. When combined with isometrics, EMS can enhance the intensity of muscle contractions, leading to greater muscle activation and fatigue resistance (Wired Fit).
- BFRT adds another layer of muscle activation by creating metabolic stress and muscle cell swelling, which further enhances the muscle growth signals initiated by EMS and isometric holds (BioMed Central).
- Greater Hypertrophy:
- The combination of BFRT and isometric exercises can significantly increase muscle thickness and cross-sectional area due to the heightened metabolic stress and sustained muscle tension (BioMed Central).
- EMS promotes hypertrophy by inducing powerful muscle contractions that can be maintained during isometric holds, ensuring continuous muscle engagement and growth (Wired Fit) (Fitness Fahrenheit).
- Improved Strength and Endurance:
- Isometric exercises with EMS enhance neuromuscular efficiency and muscular endurance. The continuous tension from isometrics and the additional stimulation from EMS improve strength in specific muscle groups, especially when muscles are under maximal load without movement (BarBend) (Health & Fitness Blog – NASM).
- BFRT contributes to strength gains by facilitating muscle adaptation even with low-load exercises, which is beneficial for joint health and reducing injury risk while still achieving strength improvements (BioMed Central).
- Increased Efficiency:
- Integrating these three techniques allows for efficient and effective workouts that maximize muscle engagement in less time. This is ideal for individuals with busy schedules or those looking to optimize their training sessions (Wired Fit) (BarBend).
- The low-load nature of BFRT combined with the targeted stimulation from EMS and the endurance benefits of isometric holds means that significant results can be achieved without the need for heavy weights or prolonged sessions (BioMed Central).
Practical Application and Example Routine
Warm-Up:
- 5-10 minutes of dynamic stretching and light cardio to prepare the muscles.
Isometric Exercise with EMS and BFRT:
- Isometric Squats:
- Setup: Apply BFRT cuffs to the upper thighs and EMS electrodes to the quadriceps.
- Exercise: Perform isometric squats, holding the position for 30-60 seconds.
- Sets/Reps: 3-4 sets with 1-2 minutes of rest between sets.
- Isometric Planks:
- Setup: Apply BFRT cuffs to the upper arms and EMS electrodes to the abdominal muscles.
- Exercise: Hold a plank position for 30-60 seconds.
- Sets/Reps: 3-4 sets with 1-2 minutes of rest between sets.
Cool Down:
- 5-10 minutes of static stretching focusing on the major muscle groups worked.
Implementation Tips
- Adjust Intensity:
- Start with lower intensity and duration for both EMS and BFRT, gradually increasing as your body adapts.
- Monitor Responses:
- Pay attention to how your body responds to the combined stress of EMS, BFRT, and isometric holds. Adjust the training variables accordingly to avoid overtraining.
- Consult Professionals:
- Work with a fitness professional or physical therapist to ensure proper technique and safe implementation of these advanced training modalities.
Conclusion
Combining EMS, BFRT, and isometric exercises can create a highly effective and efficient training program that maximizes muscle hypertrophy, strength, and neuromuscular adaptation. By leveraging the unique benefits of each modality, you can achieve significant improvements in your fitness and overall performance. This integrated approach provides a comprehensive solution for those looking to optimize their workout routines and achieve better results in less time.
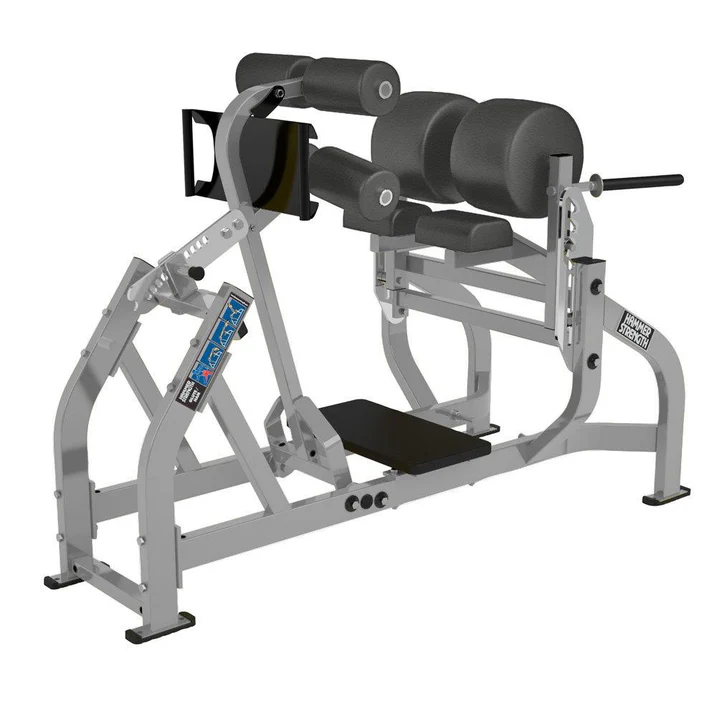
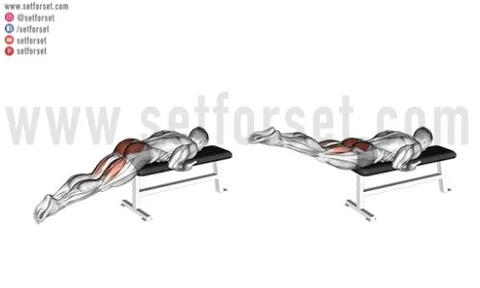
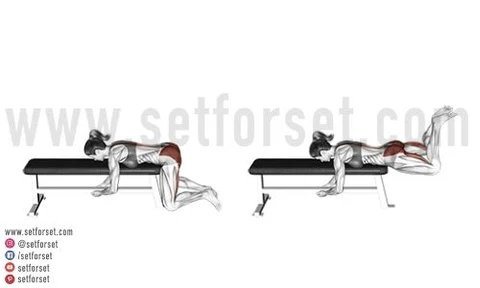
How to use the Hammer Strength Glute Ham Machine Properly
OK I found a gym up the road with a Reverse Hyper Pendulum. Awesome just had a session.
Right next to it they have a glute ham machine. It has pictures on it of proper use but I couldn’t quite figure it out.
I asked the gym instructor & he didn’t know what the hell he was doing so I just looked it up online.
Here is the machine:
First up this guy uses a different machine but explains the biomechanics very well:
OK Now here is a person using the machine correctly:
Here is a second person using the machine correctly:
OK so that’s how you do it and why.

I did Alternate Day Fasting for an entire month
Yes this was a few months back at the start of New Zealand’s summer. Alternate day fasting is exactly that. One day you eat normally, the next day you dont eat at all.
I didn’t eat for 3 or 4 days of the week for 4 weeks.
Did I shrivel up into a skinny runt?
No but I did lose 3 kg. I expected to lose at least 5-6 kg so was glad as I kept all of my muscle mass.
Did I become a weakling ?
Yes my muscle glycogen by the end of the month was severely depleted and I felt weak as a kitten in the gym. My weight training was poor but my cardio was barely affected at all.
Did I lose fat ?
Yes and lots of it which means I must have improved my body composition. My guts lost all bloat and a few inches.
Would I do it again ?
Yes but not for 4 consecutive weeks. The problem was the glycogen crash which was worst in the final week. I would have lost muscle fast if I had kept going after that.
I think a weight lifter could do this 1 week of the month. Remember this is alternate day not occasional day.
You could try 2 consecutive weeks but again the glycogen will get hit. At the max 2 alternate weeks in a month.
You will save money on groceries $$
You will lose fat
You will give your insides a break
You will extend your lifespan
Autogenics Meditation Training Update
I have been a meditator since I was very young, at least 16 for formal meditation, but even as a kid, I used to be able to do it, but didn’t realize I was meditating.
As a young child, I could visualize very clearly, especially while lying in bed at night and in the morning. Also, I could control my circulation in my hands and make them go red and hot or cool them down just by willing it.
Now I know these things are formalized in the system of Autogenic Training.
The basic stage will take you into very deep relaxation and autonomic control.
Getting to the stage beyond this is where myself and many others get stuck. At the advanced stage of Autogenic Training, you begin to meditate, and for many people, the visualization of colors and imagery comes spontaneously, as it did for me as a child.
Stress and trauma in life can put a spanner in the works, as the body subconsciously gets stuck in fight or flight mode, and the imagination gets squelched. It can stay literally switched off by the brain. The spontaneous visualization and opening of the mind’s eye, in this case, just stubbornly won’t happen.
There is a simple solution: Image Streaming. In Autogenics, you can do it yourself or with a therapist. The subject (you) will simply describe out loud in detail what they see in their mind’s eye. This connects the subconscious right brain with the conscious verbal left brain. Over time, the imagination becomes conscious. The brain is designed to be interhemispheric, and the state of most people’s brains is dysfunctional.
So image streaming is the next technique to master after the basic Autogenic exercises. If you are lucky, the visualizations will come spontaneously. If they don’t, it’s no problem, as they will certainly happen with the assistance of image streaming.
You simply describe in great detail everything you sense in your mind’s eye. You can add all senses. You literally let the images flow from your subconscious right brain. This is a natural reflex, so they will come abundantly and eventually more and more vividly.
You will, with a little training, experience more vivid mental imagery. It will become 3D and very detailed.
Now, all this training is done in a state of deep, restorative Autogenic Relaxation. It’s a restorative process of brain repair and growth.
There are of course other things going on neurologically apart from interhemispheric communication and the development of the corpus collosum. There is also a neural polarity switch when imagery comes from the imagination rather the sensory organs.
But you dont have to take this into account for the training to work.
There are plenty of very detailed books on Autogenic Training and Image Streaming.
- Image Streaming by Charles Roman
- The Genius Code
- The Einstein Factor
- Autogenic Training by Luthe
- 5 volume set of text books on Autogenic Therapy by Shultz & Luthe
- Autogenic Training by Sadigh
- Advanced Autogenic Training And Primal Awareness by Endredy
I strongly suggest you use both methods as part of the same training system.
You may also want to take a look at the book The Right Brain And The Unconscious Discovering The Stranger Within. In addition Luthe wrote a book called the Creativity Mobilization Technique which is a kind of art therapy.
Now with strong skills in Autogenic Meditation and Image Streaming you will have very formidable cognitive capability and resilience. To go beyond this you may delve into advanced self hypnosis.
Intervertebral disk injury & degeneration
So what can you do when the x-ray or MRI comes back & that back pain has been caused by disk degeneration all along?
This is what it may look like in there…
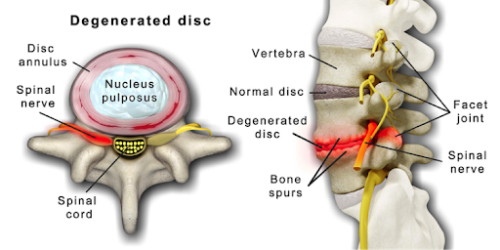
Thats kind of how mine looks except its two disks and the bone spur sticks out real sharp.
Well basically you have five different options which I will list here.
- Ignore it & suck up the pain. Yep I did this unwittingly as after multiple visits to physio’s, doctors etc none of them did an x-ray or anything to help. A doctor may offer you anti inflammatory drugs but many of these can cause clotting & heart attacks over time. Others cause gut problems. Over time the injury will get worse and many people have barely any disk left with the vertebrae eventually fusing together.
- Physical therapy. Now if you decide to take action you will have to stop any activity that is putting serious pressure on your disks. You need to minimize loading on the spine & stretch that sucker. That means no more dead lifts, squats, over head press. No more physical laboring work, No renovating, digging, lifting etc. You can however still do pullups, and many other weight lifting exercises. Some actually stretch the spine and will help with the problem. Also running is out but stairmaster is in. I also recommend Yin Yoga & the program at ultimatehumanperformance.com.
- Laser ablation surgery. Say you try the physical therapy & it does work (because it will) but still you cant do your job or workout like you want to. Or maybe for you the pain is still too great. The next step is a laser treatment that has 95% success. The surgeon will burn off the disk henia with a laser. Here is the top US specialist for this relatively new therapy https://deukspine.com/. This should be your first choice for surgery as its barely even a surgery at all.
- Artificial disk replacement. This one is a bit more serious. They will actually replace the disk with an artificial one & there is a 90% success rate. That means there will be a 1:10 chance you will be screwed. But you are already anyway without surgery at this stage. If it succeeds its problem solved as people are back to normal in a few weeks. Most people can walk immediately with minimal pain. After recovery you will be able to carry a backpack again and resume work. The only suck? They may go in through your guts.
- Vertebrae fusion. This one sucks but its the only surgery they used to do. If your disk is really stuffed its still what they will do. The disk is removed and the bones of the vertebrae are screwed together. You lose all mobility from the joint and more strain is placed on the joints on either side. In 5 years or so you will need more joints fused as a consequence. This is your last resort if the pain is too bad. 80-90% success rate.
So those are your options in order of risk. If you are young & never had any disk problems it all sounds like an utter nightmare. As you get older this shit becomes normal no matter how fit, healthy & strong you are.