Archive for January, 2017
What are you training for?
What are you training for?
I would hope the answer to that question is long term health & physical well being.
Well no thats why people should train & its why I train but many people get side tracked. Even I get side tracked too.
Some people train to improve sports skills, to get or stay in a job, to score the opposite sex etc.
So this in turn turns any sports advice upside down. For example I just saw a twitter tweet that got my goat. it was quoting a study showing greater gains from whole body training 3x per week than split training.
Now most people will see that and think wow – thats me I’ll train just 3x per week whole body and get better gains
The study was for 3 months. This is the maximum length that a whole body routine is recommended for beginers.
Its only after that you are meant to begin split training. But people will misinterpret the research because of the way it was presented.
OK lets chuck in a couple more of these paradigms – backed by research papers.
Lets say they also choose to train just with sandbags because another paper or trainer said it is better.
Lets say they choose to follow a high fat diet because some other guy says cholesterol doesnt matter.
Now if you combine enough of these half assed half researched idea’s together & you will end up with a pretty FUBAR athlete.
They may shine like a star briefly or even for a few years. Then kaput.
Enough people have trained with weights & enough research has been done that the standard principles are well defined.
Long term whole body training leads to increased injury & burnout & stagnation of gains. Its common knowlege.
Cholesterol is linked to heart disease – its a fact – accept it.
On and on. Its no good to look at a 3 month study and base your training fully upon than. Or a limited study in a specific population with a genetic disposition.
There are basic training principles that work. If you dont follow them you will get injured & ill more frequently.
If you train for a sport or career your training will be out of skew with whats best long term for your body.
Simple facts.
The myth of “functional” training
The word functional has a dual meaning. It can mean functional as opposed to dysfunctional or it can mean functional as in serving a narrow defined function.
The function of the organism may be compromised by a narrowly defined function.
So when these guys say they are into “functional training” do they mean they are into training you as a functional organism?
Or are they training you to perform a specific function?
Two totally different things with different outcomes.
Most of these functional training programs are in fact to train people for a specific job or to repair an injury.
They are not an over all training program for a fully functional human being. They can not and never will be.
So if you want a long term program to make you the best functional organism – thats traditional bodybuilding.
If you want to become a tactical operator, repair a leg injury, be good at football etc – take up some form of “functional” training.
But just be aware that its functional in name only & in the long term is dysfunctional.
Special forces operator training programs
There are some really decent special forces fitness programs floating around on the net these days.
A couple of very simple effective programs are here for you to download.
Selected: Selected Ebook
How to use this course.
A very successful Olympic running coach once said that the better prepared athlete would always beat
the faster athlete. We think he’s right. In the US Army Special Forces selection and assessment course
you may be competing for selection against faster or stronger servicemen. But, if you have completed
this course, done the workouts and absorbed the educational material – and put into practice what you
have learned – you will be one of the best prepared applicants and more likely to succeed.
SFAS Training Manual: Training for the tactical athlete
SFAS 14 week strength :SFAS 14 Week Strength
SFAS 6 week strength: SFAS 6 Week Strength
SFAS 14 week prep: 14 week prep
SFAS 10 week prep: 10 week prep
Rotator cuff update
Four months since rotator cuff injury occured.
Two months back I wrote that I expected to be pain & inflammation free by now.
When I first got injured I thought the whole thing would be gone by now.
Well I am pain & inflammation free so long as I dont aggravate it. My ROM is 90% where as for 3 months it was 50%.
I can now gently stretch on a pullup bar some what restrained without pain. Certainly I can not free hang yet.
I would place that as two months away.
I can do restrained pressups and kettlebell rows. I can even rack the 16kg kettlebell on the injured side but only a few reps & wont be doing any ballistic stuff for weeks if not months.
I did put all of my gear up for auction & it didnt sell so I will keep it all for time being. I am only training shoulders once per week from now on for strength or muscle mass.
Obviously shoulder rehab is daily in some form.
I have found a new physio that does Active Release Therapy so I will start seeing the new one. Old physio was good but not specialized for the next phase.
I will join the closest gym. 3 minutes from my door & train there daily. No need to train shoulders at the gym as I have all of the gear at home.
My training will be rehab, bodybuilding & cardio focused.
Hopefully in May or June I will be healed up. I still intend to get a platlete shot too. Possibly into both shoulders if ultrasound reveals damage in the right too. Certainly the left will be getting an injection.
How will I split my training?
Well maybe variations of the following
Grip day
Shoulder day
Upper Arm day
Leg day
Chest day
Back day
Cardio & rehab on most days
I also need to get back into a proper stretching / yoga routine
As many sauna’s as I can fit in
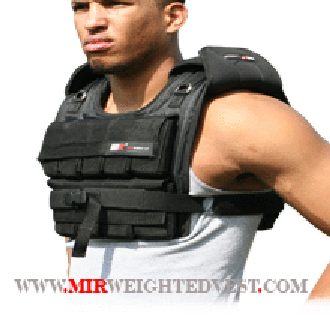
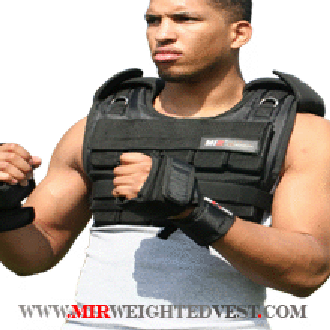
How to rig your heavy weight vest for safety
When I say heavy I mean upwards of 50 lbs. Prior to my shoulder injury I was training with 80lbs for an hour at a time minimum.
So there are two ways a weight vest will injure you:
1. Excessive Occlusion
This is when the circulation cuts off in your arms because of the pressure on your shoulders. You will have totally numb arms. Even a 40 lb vest will do this after 3-5 hours.
2. Putting it on & off
This is how I tore my rotator cuff. 50, 60 80 lbs is not very heavy for a dumbell or kettlebell. This is a floppy uncontrollable odd shaped object.
There are a couple of videos online for technique to put a vest on – yeah sure if its 20 lbs & of the design shown.
The fact is once you are up to 50 lbs even with a good vest & proper form these techniques will kill your shoulder joints.
The Solutions:
1. Shoulder pads
MIR now has shoulder pads
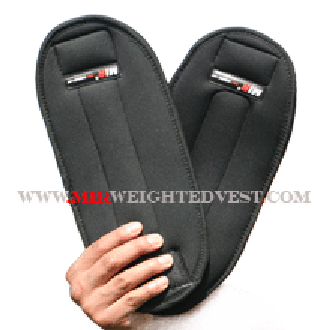
OK awesome a must have
2. A Weight Vest Rack
Yet to be built – heres what you need to do. See those shoulder pads above. Imagine if they were a little more robust at the top where the velcro attaches them. Imagine if they were robust enough to support the full weight of the vest held on two protruding bars.
These two bars could be sticking out of a wall or on a rack.
You would simply walk forward duck under the vest & slip your head inside. Then step back moving the vest off the bars. Your vest would be on with zero dangerous shoulder movement.
Taking it off would be just as easy.
Once my rotator cuff heals up I will build this setup. Using a heavy vest any other way is like trying to squat but always lifting the bar from the ground & onto your back. That is madness.
Here are the two methods of putting your vest on that WILL NOT WORK with a heavy vest EG: 50lbs+
Same with the super hanger – useless with a real heavy vest
Whats needed is a Weight Vest Rack
A search online reveals the complete wrong design weight vest rack
This is retarded. Totally the wrong design & pointless. You need the vest to be suspended from two bars at a right angle to the shoulders. Then you just slip up and under & the vest is on. Taking it off would be even easier as you would simply walk forward & slide the vest shoulder pads onto the two bars.
UPDATE:
OK I had an evenings sleep & came up with a quick simple solution. First up you need a squat rack. These are cheap. You also need a dipping attachment for the rack. Cheapest I can find are pictured below:
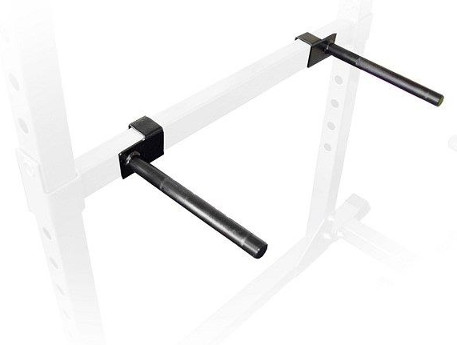
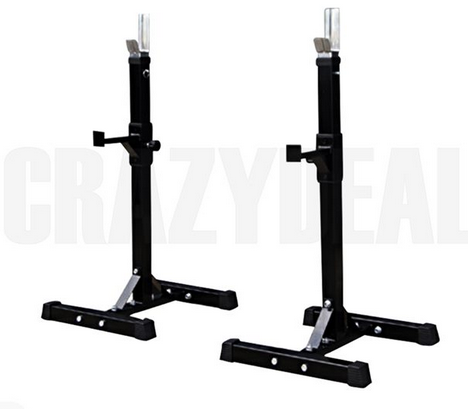
I can pick those up for under $200 brand new locally
OK so you will need a cross bar to attach the dip bars to. Thats just square steel tube which will need to be secured to the rack.
The rack incedentaly extends to shoulder height – its for squating.
OK so next you want to get a pair of the mir shoulder pads. I did look into backpack shoulder strap pads but these seem less heavy duty & are the wrong shape. Go with the MIR ones.
Looking at the MIR pads they may not actually be long enough. If so use a Tactical Waist Padded Belt.
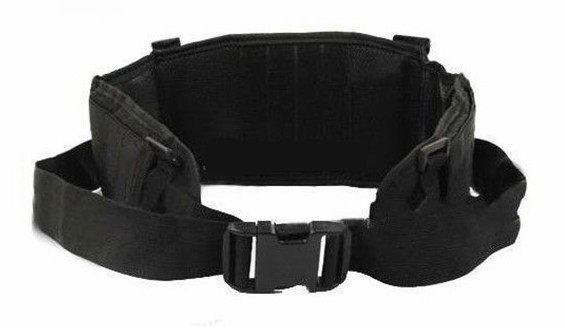
Now you want some gorilla glue or liquid nails. See how the MIR pads connect with velcro? You are gunna glue them together glued on forever.
DO NOT glue them to the vest straps. Just glue them shut. before you do make sure the two dip bar prongs will slide in with the vest on your shouders.
OK finally get some duct tape & tape around the whole shoulder pad until you are confident its strong enough to hold 100+ lbs on the rack for months at a time.
Thats it man !!! You now have the safest possible setup for weight vest training.
One caveat is that the duct tape may detract from the padding. You can carefully duct tape just the top part of the padding looping it around. Good luck.
The padding is OK if its loose at the top & you will of course still want it to be comfortable. Better get some real good glue.
FINAL WARNING!!!
Had I done this two years ago I would not now have a torn rotator cuff.